Friday 27 December 2013

Record Holder

Take care of the music that takes care of you

Vinyl collections seem to multiply in numbers similar to rabbits. To remedy this "problem", some vertical grain fir and short 2x6 sections were employed to create a nice way to store 30-40 records.

No more stacking records on the floor. This stand helps keep the current favorites in the rotation upright, safe and accessible. Any manor of sizes can be made. 

The vertical pieces are set into the solid 2x6 rails and secured with wood glue. A nice 18 degree angle ensures the records rest at a comfortable angle. For a finish, I prayed it with 3 coats of Aquaspar. A very durable material that will help protect the wood from hopefully heavy, constant use. The final sand for the 3rd coat renders a smooth feel--perfect for the rails to help move the LP along its journey back and forth.

I like using vertical grain fir because the repeated grains relate to the nature of the record with the tight lines that hold all that great music. But really any wood species can be used.


A nice little skip in the grains that only nature can perfect


Records do get heavy, so I made sure to line the bottom of the rails with some cork. This keeps things safe and stable.

Monday 9 December 2013

Sellwood Patio


This project was personal. Literally.


For several years I had been dreaming about building a patio to better enjoy the large front yard. The design changed and thanks to my wise wife, grew to surround the beautiful 70 year old Cherry tree that is the main feature of our little humble house.


The design is one of simplicity. An open mesh allows all to enjoy the tree and the lovely space. The height of the fence allows a sitting party outside to have some privacy from folks on the sidewalk--yet still allows easy neighborly interaction.

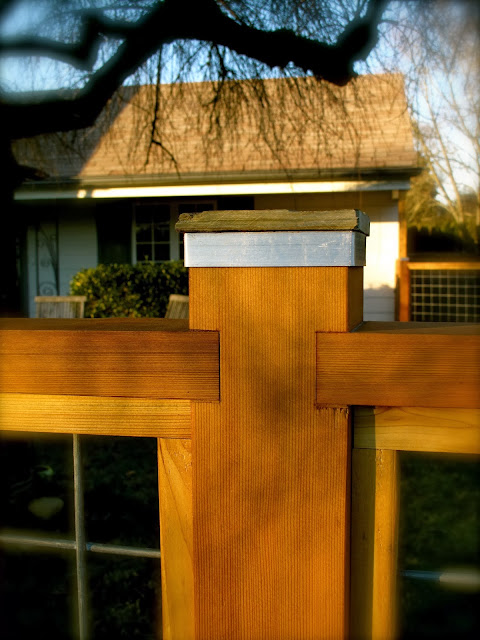
I sourced Clear S4S Cedar and Tight Knot Cedar posts. The galvanized Utility Panel is a bit thicker than the usual fencing material, but it is tough and durable.


One extra measure that is well worth doing on any fence that bisects an existing lawn, is to dig a trench and line it with pea gravel. Not only does this give the fence more of a noble stance, but it prevents the grass from growing up beneath the fence. No need to mow or weed whack beneath the wood. A bit of steel that will eventually patina with a nice orange rust adds to the earthy tones of the wood and help keeps the gravel where it should be.


The cherry tree in our yard always reminds me of the Japanese blossom photos. So in the design, I decided to incorporate a bit of the old style with mortise joints. This also helps the stability of the fence. The gates also get the wood joinery treatment.


There are 3 gates along the perimeter. This allows for easy flow from the front door approach, sidewalk or driveway entry. Since the material (Cedar) is so light and my design simple, I was able to make the openings very wide--for things like big trash cans, lawn mowers. . .ect. For the garage entry, the span between the support post and the garage was wide enough to allow a 60 / 40 split with the shorter side locked into the concrete with a simple cane bolt feeding down into a small galvanized pipe set in the concrete. This tight metal - metal fit helps stabilise the gates and keep them aligned perfectly.


The driveway side of the gate sort of zig zags its way along the grass line and meanders back to the corner of the garage. This created some challenges with all the changes in angles and the wood joinery. With a bit of determination, some helpful hand tools and some luck, we got a nice tight fit.


The posts are topped with some slate I had lying around and wrapped beneath with some aluminum trim. This gives the fence a bit of a different look, but one that strikes a balance with the different materials (wood, stone and metal).


Deck Replacement Outer SE Portland


Summertime is fence, gate and deck season. When presented the opportunity to enjoy the late summer weather on the shoulder of Mt. Scott with views of Mt. St. Helens, I jumped at it.


I made sure not to jump on the deck though, for fear of falling through in some places. What looked like neglected boards turned out to be rotten supports and poor design.


Fortunately, the fixes were straightforward and the structure was happy to receive new tight knot cedar 2 x 6's. A LOT of lumber as it turns out.


We built the railing out of Cedar as well. It was all sealed up with oil to help it last the wet and cold months.


Now the clients are out on the deck whenever they get the chance.


Little Bathroom Refresh Outer SE Portland


Sometimes a little bathroom beneath the stairs needs some help. This little tiny space needed an upgrade before the client's threw a fun wedding in their back yard.

Obviously, space is at a premium. So we decided to take a minimalist approach with getting rid of the vanity (it really only held TP and some soap) and install a nice corner sink with exposed chrome plumbing. I built a tiny built in shelf between the studs for the few essentials. New toilet, baseboard, marmolium floor and paint.


Wednesday 8 May 2013

UPcycled Sash Windows

Found these beauties at HIPPO Hardware in Portland. A truly crazy place with crazy prices. But if you can talk the talk, there is a possibility to whittle them down so they only make a 300% profit.


Beautiful original Stain Grade Fir with the oil separating from the schellac. Most old sash windows have a century of paint caked on them. Not these. Original stain and finish from the early 1900's. Cool little bumps form after the decades have expedited chemical decay--I call it Reptile skin.


The glass was solid--no cracks or chips. So it became a grease board for the office.

Some brass screws in a few beefy wall anchors and a few trim screws angled into the wall on the bottom and this thing is solid.


Phone Charging Station

I found a good use for a beautiful little slab of Walnut that was pulled out of the "to burn" bin at the wood shop.


For too long my wife was charging her phone on the windowsill, leaving the cord dangling across the wall. It bothered me. All these tools in the garage and she has to use the old windowsill? NOT ON MY WATCH! Plus I have a nice little antique phone box for mine . . ..so I felt a wee bit guilty too.


Perfect Perch


 She always likes the wood scraps I bring home from the wood shop--especially the walnut. So, a little Danish Oil, a special finish and a bit of creative mounting hardware and voila!


Operators are standing by. . . :)

I combined toggle anchors, threaded rod and a few small nuts to allow this shelf to slide out a bit so the lady on the go can take her charger with her.

Interstate Fence in N.Portland

After a few re-draws and estimations for design and materials, the client and I came up with something in their price range and my design / build wheelhouse.

3 Gates and 40 feet of area to finally enclose a lovely yard to give the client's some much deserved privacy. 

Flush cutting 1/2" dowels

My first site visit proved encouraging. They most surely needed SOMETHING there to tie in the property. The lovely green lawn abruptly ended and a mixed array of low pet fencing was the only thing preventing the dogs and kids from wandering into the neighbor's wild and neglected yard.


Time to make a wood wall

The client was very wise to paint the pressure treated posts black. This matched the hardware and will serve to protect the wood even more. It also avoids the awful contrast that Cedar and Pressure Treated lumber face after several years of sun and rain. Bright Orange, chemically stained wood and the natural grey patina of Cedar. Painting a square post is quite simple--since they need to stand alone for a few days while the concrete sets up.

What a difference


With 3 gates in the design, the wall would need to be interrupted a few times, with some tricky angles before the property line jogs to the corner of the garage. I opted to mortise in the horizontal supports on the short, angled returns, since they fed into the two large gates that can, if desired, be both opened and a car can be driven through to the detached garage.


Tricky angles, Solid lateral support.


The main entry gate was fitted with my standard magnetic catch and security bolt latch. I added a pull handle to ease the exit for the clients leaving their yard. Everyone seems to agree the force required to pull the magnet open is perfect and feels solid every time.


Building the gate in the wood shop.


JET Carpentry's standard Lap joint gate with 1/2" dowel reinforcement. Light and strong.


1" rare earth magnet set in cup ready for duty. No more annoying latches that always mis-align.


Extra security so you can lock the gate if desired.


Luna putting my work to the real test.

Porch view much improved.


Saturday 6 April 2013

Vancouver Mantel


What a difference light, paint and hitting the "refresh" button makes!

Once again, my client karma was very, very good when a lovely young couple contacted me about building a mantel around their new gas fireplace insert.


We brainstormed a bit about how far to go and what to put up there. The original built in shelf was lackluster and required a replacement. The new mantel got an electrical outlet and the windows were re-trimmed, this time with a plumb and horizontal theme!


  The panelling came down easily enough and we began to play with the proportions and deal with the a symmetry of the walls and design.


Reclaimed Fir Coffee Table


The wood came out of an attic of a 1926 Bungalow and was simply waiting to be re-born. Simple chevron pattern, a lot of sanding and finishing later and voila!

The long, black hairpin table legs really seal the deal for this design. Simple and clean. A piece of 3/16" glass cut for the top helps the soft surface survive many cups of coffee.


Clamp time


Final resting place with Glass top


Wine Cellar


This is the kind of project and client combination every carpenter dreams about. Every step of this process was a pleasure--OK not the sewer line re-rout--but everything else.

When the clients are as nice, attentive and understanding as these were, everything is possible.

They knew what they wanted, Cedar walls, cedar racks, hardwood floors. After some serious research on my end, I had a design that could work with the space under the house. Their goal was 700 bottle capacity--mostly Pinot Noir. We ended up with 770 slots.

BEFORE


After the initial framing of the structure, shoring up the plumbing, electrical and HVAC requirements and cutting in the doorway, the goal became to make an air tight, cold room. Consistent temperature (54 degrees) and constant humidity levels (60%) were paramount. The Cedar walls ironically make it look like a sauna before the wine went on the wall.

time to put some (more) wood on the walls

It became a running joke in the wood shop that I was building  a bunch of ladders for cats to climb on. The fabrication process was very, very, very repetitive. Thousands of narrow crown staples later, my modular design was ready for the big install. Because the doors were fairly narrow and low, we could not make one big rack and fit it to the wall.

One of 5 buckets necessary for 700+ bottles

and again . . . .and again . . .and again . . .

VG Fir cabinet with granite top tasting bar. Each bay can swallow 2 cases + magnums at the end
So many
Soft close drawers on one continuous Fir face frame.


Clear Western Red Cedar walls simply shine. No stain necessary.